Sunday 30 November 2014

Tim's tag November '14

So I've got a little behind with Tim's tags the last couple of months, (& only just time to do this month's tag before the new one tomorrow!).
As it's now less than a month before Christmas (help!!) I though I'd go with a more wintery theme than Tim's autumn theme.  I haven't got any of his dies with texture fades, so I had to improvise!

I've recently bought Tim's prancing reindeer die, & I'd already cut it out from a piece of white corrugated cardboard.  I used the gothic stencil to lightly emboss the background tag, & added dots with an embossing ink pen to add the sticky embossing powder & gilding flakes.  Then a quick distressing on the cardboard.  I used die cut letters which I painted pewter (to match the spray) for 'believe' which I added to a stained piece of  lace.
I'm glad I had a little time to do this, hopefully I'll have time for the next one as well!
Back soon (fingers crossed!).    Kay

Wednesday 3 September 2014

Tim's tag - September

So, for once, I'm early for Tim's monthly tag (September)!  For me, Tim's new technique for 'faded layers' is slightly easier than the one he showed us in Creative Chemistry 102 & the Compendium of Curiosities vol iii - a slightly different effect I think, as the stencilled shapes tend to remain white, rather than just faded colour (which I've found quite difficult if I've used lots of alcohol ink!).
Anyway, although I've got quite of few of Tim's stencils, I decided to use a Dyan Reaveley diamond stencil for the background (inked over with Aqua alcohol ink).  I added multiple stampings of one of Tim's stamps (from Nature's Moments - one of my 'go to' sets!) and decided on the 'frenzy' of butterflies flying over the tag.  I must have somehow known, I've been wanting the Butterfly Frenzy decorative strip since it was first launched; I finally ordered it 2 days ago, & it came the next day, 1st September, so as soon as it arrived, I was all set!  I just love all the tiny butterflies! And I love how they're so vibrant & shiny using various colours of alcohol inks!  (And I've still got plenty to use on another project!)  Finally, just added a few remnant rubs, & it was finished!
the finished tag
tiny butterflies - detail - I used a couple of different text stamps on them

more tiny butterflies!
 Back soon!     Kay

Sunday 31 August 2014

Tim's August 2014 tag

And I'm back to 'last minute' posting again for Tim's August tag!  Where has this month gone?!
I followed Tim's technique fairly closely, using what I had (the face stamp is by IndigoBlu, a UK company - she's Jane Austen's heroine Elizabeth Bennet from 'Pride & Prejudice' - I love this book!)

I love the effect of the texture paste through the stencils, especially the roses from Tim's 'Doily' stencil, so pretty!
Back soon!     Kay

Friday 15 August 2014

CC3 - Challenge 8

Just in time (again!) for the next Compendium of Curiosities challenge organised by Linda at Studio L3.  As this is an even-numbered challenge, it's sponsored by the Funkie Junkie Boutique.
The technique this time is 'Faded Layers', in Tim's Compendium of Curiosities vol. III on page 58 ... (you'll have to get the book to follow the technique!)
It gives a lovely effect, but it can be a little 'tricky' (!), but I eventually got a few pieces that I was happy with!
So I decided to create a 'Bon Voyage' card... I used Tim's 'Vintage Valise' Sizzix die.  I used one piece for the main body of the case, another for the case 'trimmings', and a final piece for the tags.

Back soon!     Kay

Friday 1 August 2014

CC3 - Challenge 7

We've been up in Scotland for a week, seeing some of the Commonwealth Games - a great trip!
We only got back yesterday evening, so I'm just in time for Linda's Studio L3 challenge 7 for Tim's Compendium of Curiosities vol 3, this time sponsored by Inspiration Emporium.

Whilst we were staying in Edinburgh, we ate at an Indian restaurant which was decorated in 'Charles Rennie Mackintosh' style ... & I was inspired by one of the small decorative mirrors, to do this 'painted industrial' piece, using picked raspberry & peacock feathers for the birds & heart ...


Back soon !     Kay

Friday 18 July 2014

Tim's July 2014 tag

So I've completed Tim's tag for July already (needed to get it done before the end of the month as we're away for a few days then!)

I've just got the 'Movers & Shapers' seahorse & sand dollar, so I added two seahorses & 'share' ...  I used a swirl embossing folder for the acetate - sort of sea-like (?) & I like the way the swirls echo the swirls of the seahorses' tails!
& I had great fun making the 'sand'!!!

Back soon!     Kay

Thursday 3 July 2014

CC3 - Challenge 5

And this time, the challenge is to use Tim's Distress watercolour technique (on page 39 of his Compendium of Curiosities vol 3).  Details as before; challenge run by Linda Ledbetter at Studio L3 and sponsored this time by Inspiration Emporium.

So I decided to make a simple watercolour card ... (stamp is a background stamp from the British company Lili of the Valley).  So I used the technique on the rose & flourish top left, then 'grunged it up' a bit!   And finally I added a diecut oval, remnant rub, & inked crinkle ribbon ...


There's another part to this technique, but that's on the following page, so it'll be another challenge, so I'll leave that until then!

Back soon!      Kay

Friday 20 June 2014

CC3 - Challenge 4

And I'm just in time (again!) for Linda at Studio L3's next challenge for Tim's "Compendium of Curiosities vol 3) - play along if you've got the book! (technique is on p. 49) This time sponsored by the Funkie Junkie Boutique, & another chance for goodies from Tim & Mario.

So this time, its using stencils with texture paste ... so I decided to alter a plain, 'kraft' notebook (around 6" x 4", & a bit darker in real life!) ...


So I followed Tim's technique, & this is what I came up with; with stencils, texture paste, just 3 distress colours (crushed olive, peacock feathers & seedless preserves - love these colours together!) & a little stamping; front ...

And back ...


A simple closure, & it was done! - just adding a layer of matte gel medium over the top for protection ...

Back soon, I've still got Tim's June tag to finish!     Kay

Friday 6 June 2014

CC3 - Challenge 3

I love using Tim's faux tea roses technique which is in his Compendium of Curiosities vol 3 page 65 ... so here's my take on it, just in time for Linda Ledbetter's Studio L3 challenge!  This time, it's sponsored by Inspiration Emporium, with a $50 Gift Certificate up for grabs!  And, the chance of some goodies from Tim & Mario!!

I painted the wooden heart with white picket fence, then used paint through Tim's Doily stencil for the background - a little too much, so I then went over the whole heart with picket fence stain, which toned it down nicely!  Then I edged with picked raspberry ink over seedless preserves paint!  I then added the tea roses, & a couple of leaf dies & metal embellishments.  And finally, one of Tim's quote stamps (one I use a lot!).

I enjoyed this!  Back soon!     Kay

Saturday 31 May 2014

Tim's tags 2014 - May

It took me a while (30 days in fact) to get around to doing Tim's May tag this month!!!  So, just in time, here's my tag for May!


Somewhat of a challenge, in fact; as Tim says "we’re using our favorite trinkets and embellishments (you know, that stash of things we collect just to admire and cherish the fact that we simply have them)" So I've used some of my bits & pieces I'd got 'saved' up!  With Tim's example having a butterfly as the main focus, I thought I'd go with this, hence the words, butterflies & birds!

The backgrounds for my tiles were pieces cut from Tim's Menagerie paper, the bird is Tim's, the bird cage & the feather other embellishments I've had for a while & wooden butterfly & hearts.  The paper butterfly is one I'd die cut for another project (which I haven't done yet, but I've got several more cut out!).  And finally a 'jewel' from a keyring I bought at a George Michael concert about 8 years ago - it finally 'disintergrated', but I've still got most of the 'bits'!


I haven't yet got any of the ShadowPress words, so I decided to do a faux take on it.  I stamped the words (using foam stamps I'd cut from Tim's Chip Block alphabet die) & then edged the letters in pen to make a shadow effect.  
On the tag background, I used peacock feathers & spiced marmalade ink pads (I'd also used this one on the edges of the tiles) & a little walnut stain.  And for the 'ribbon', I used a piece of raffia I've had for ages, but not used in a long while!

Finally, I added a few pieces of remnant rubs from my stash, & now waiting for Tim's June tag!

Back soon!     Kay

Tuesday 6 May 2014

CC3 - Challenge 1

It's time for the next round of Tim's Compendium of Curiosities challenges, this time using volume iii of his book, hosted by Linda Ledbetter at Studio L3.  This first challenge is sponsored by Inspiration Emporium.  This time round, Linda has got together a team of very talented crafters to give us even more inspiration, so there's lots of loveliness for this first challenge!

The first technique is from page 43 in the book (sorry, can't share the technique, but it uses distress paints!)...


I tried the technique on a tag first, & then, with different colours (rusty hinge, peacock feathers & seedless preserves) on a mini (2 3/4" canvas).  A very different effect!

Can you see the heart?  When I'd done the canvas background I saw a heart shape (very faint!) - how's that for 'serendipity'!  So I decided to 'enhance' the heart - I cut a mask & stamped with Versamark, & added Ranger's Frosted Crystal embossing powder.  I used the 'positive' heart to mask it whilst I stamped (with picket fence distress stain) around the edges & used a white gel pen to edge the heart, along with a black pen, & I finally added a couple of rub-ons from Tim's botanical remnant rubs...  


And what about the tag?  I completed the background... & added picket fence distress stain stamping as before...

I decided to complete it with just simple stamping in black archival, with edges distressed with picket fence distress stain ...

Back soon!     Kay


Wednesday 30 April 2014

great news!!!

Hi again, some news to share with you...

Joan, one of my friends from the Queens Road Summer Market here in Watford is opening up a shop in Watford (Rebel Pebble, 98 The Parade) on Saturday for local artists & craftspeople to show & sell their work, & I'm renting a couple of shelves for my cards, canvases & more!!!

Thought I'd share a few of the things I've made recently for the shop ...

First some canvases:
Japanese cotton & lace

crackled canvas, wooden butterflies

textures with die cuts & embossing paste, heat-embossed butterflies

And then some hearts (which still need ribbon to hang!)


& lots more ideas, just need time to make!!!

Back soon!     Kay


Tim's tags - April 2014

And I'm just in time for this month's "Tim's tag" - Tim's tag here


And this time, I had most of the 'bits & pieces'!!!

The trellis Framework I bought with the voucher I'd got from Tim & Mario (from Simon Says stamp) in the draw for February's tag!!! (how's that for a good choice of goodie!).  I love this die!  & I love making the paper roses with Tim's tattered pinecone die!!  Here's the roses in detail...

The colours I used were:  antique linen & forest moss paint & peacock feathers ink for the background and peacock feathers & vintage photo for the trellis.  I edged the shapes with vintage photo, mowed lawn & spiced persimmon & I coloured the roses with milled lavender & peacock feathers.

Back soon!     Kay

Wednesday 19 March 2014

Tim's tag for March

Hi again!

I was totally amazed & shocked (and speechless!) when Tim released his tag for March!!!  Why???  Every month, all the entries go into a prize draw - imagine my shock when I saw my name in the post as one of the prize winners!!!!!  (& thanks to everyone who commented on my post!)  So at the moment I'm looking forward to the arrival of my prize!!!

So, onward & upward!

This month, Tim used his 'smudge stamping' technique to create two tags.  I did try this before when I took Tim's Creative Chemistry 102 online class although I kept muddling the two tags up!) so I had another go!  (I didn't get them muddled this time!)


As you can see, the one on the right is paler, more subtle, as it uses second-impression stamping, having already stamped the tag on the left, & using just the ink remaining on the stamp for the second tag, then a little bit of smudging to slightly blur the outlines.   I think with a little more practice, I shall really get to enjoy this technique, and 'two for the price of one'!!!
 
I used vintage photo, seedless preserves, peacock feathers & peeled paint ink pads, with a little spiced marmalade through the stencil for the background.  I used the same colours on the tag ribbons, but added more water to create a paler ribbon for the second tag.  For the little flowers, I used seedless preserves paint, with an addition of a pale grey/blue on the right. 
 
Back soon!     Kay

Tuesday 18 March 2014

A vintage journey... challenge 1

A couple of week's ago, I found a new challenge blog, A Vintage Journey; vintage, shabby chic, & Tim Holtz -  definitely me, I thought!  It's run by Brenda Brown, & she's got a great Design Team working on the blog.  Challenges are going to be every 2 weeks, and are sponsored by Countryview Crafts (a great online shop with great prices & quick delivery, and free postage in the UK).

So here's my first entry.  

The theme for this first challenge is 'Anything Tim'!  So a vast selection of inspiration to inspire me!  What would I do?  Being a 'vintage journey', I thought I'd 'travel' back in time, and revisit (loosely!) the first of Tim's tag for Christmas 2011, which was the first tag I ever completed & blogged; although I 'd seen his previous years' tags, I 'd never got around to doing any!
Tim's tag Christmas 2011 Day 1
My 2011 tag (I didn't have the pine cone die at the time)
So I revisited the tag & thought about how I could adapt it from Christmas...

As Tim said in his blog post, he was focusing on the pine cone die.  In the video, he shows how to use the die to create roses, as well as pine cones, so I decided to do these.  & I used the new foliage strip die for the greenery.  I did the background using Tim's techniques (except I didn't rub the embossing powder off the raised areas!). I covered the die cut flourish with distress glitter (not available in 2011!).  Finally, I added a few embellishments, & punched & distressed borders.  I was going to use the word 'Spring', but although I have seen a (very) few roses already with the odd flower (this early!!!) the roses didn't really fit with spring, so I used some chit-chat stickers instead.

Sunday 2 March 2014

New beginnings #2

I joined Christy Tomlinson's online Art Society Video Club back in January ... monthly inspiration for mixed media canvases. Very different, but I'm loving it! Videos come mid-month, so here's my January canvas ...


I added a layer of tissue wrap to the canvas, then painted over; added die cut patterned paper leaves which I painted over, and a couple of die cut embossed butterflies I'd done a while back & added the text.  It looked quite disjointed, so I finally sprayed over the whole canvas!
 
For the second one for January, I went 'off track' a bit!  A dark background, & for Christmas I'd got the Steeleye Span album "Wintersmith" (inspired by Terry Pratchett's tales of Tiffany Aching).  One of the songs on the album was called 'I shall wear Midnight'. I'd already done the black/grey background for my canvas.  I also had some tiny patterned leaves left over.  So I decided to create my canvas around these ...


And here's a couple for February ...


The patchwork is made of rectangles of the top layer of paper napkins (I've gathered quite a collection over the years!); faux 'stitching' added with pen.

 
For this one, I used Tim Holtz fabric for the patchwork.  As the edges of the material were already 'pinked', I cut the rectangles with pinking shears & I added a little stamping using various border stamps, with a little distress ink on the edges (back to my favourite 'muted' colours!!).
 
Back soon!     Kay


Wednesday 26 February 2014

New beginnings!

After an unproductive few months last year, I'm finally getting back into crafting!

Our Facebook group has a challenge each month - for February it's "New Beginnings", using new (or not used) products and/or a new technique.

Just over a week ago, I went up to Leicester with a friend from the group to Neil's Studio in Leicester to a workshop run by Hels Sheridan. (Neil is also a member of the group; I first met him last year at his newly opened studio in his back garden - a great creative space - Neil is also now on several craft Creative Teams - well worth checking our his blog here).  Anyway, had a great time & managed to complete a 9" x 12" canvas...


I loved doing this! 
A couple of days later I found out from my friend that Sizzix UK had cut the prices of lots of Tim Holtz dies... Now Hels provided a piece of the Harlequin border to use in class; loved this one, so versatile, & yes, it was on sale!  And as I checked the website, I saw several more reduced that were on my 'wish list'!  So, an order to Sizzix, and a couple of days later, these arrived!

 
I also sent my first order from Fernli Designs, who produce wooden / MDF laser-cut embellishment & other pieces.  I was ready to produce a Hel's type canvas with Tim Holtz dies & some Fernli cogs!  And I also bought some Dreamweaver Embossing Paste that we used at the class - love this through stencils; it has an almost 'velvety' finish, rather than molding paste, which is more glossy.
Comparison of Dreamweaver embossing paste (diamonds) & molding paste heart


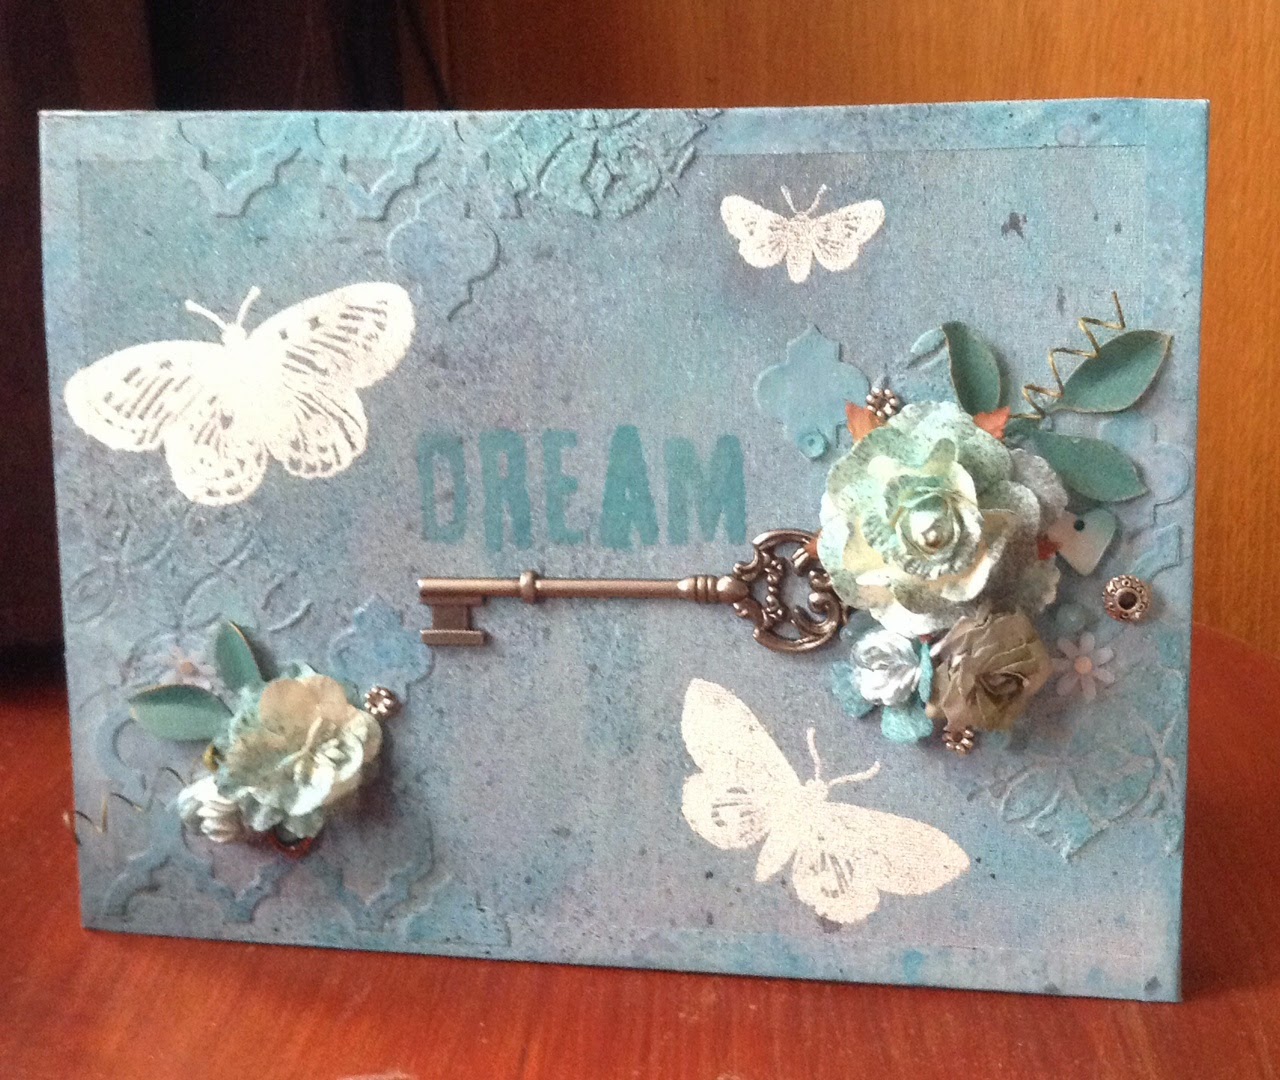
This canvas is much smaller, 6" x 4" & the canvas itself is 'chunkier', less fine-grained.  So I think it has a different feel to it.  (I think I prefer the 'original', has a much more 'open' feel to it - I think my next one will be on a larger canvas - more space to play with!).
 
I used the Harlequin & Washer Borders - both the die cuts themselves & the pieces that were left.  And I used the Old Jalopy Mover & Shaper. All the wooden bits are Fernli Designs, apart from the tiny hearts, which I picked up from ArtCuts at Alexandra Palace Stamping & Scrapbooking Show last year.  And the embossing paste is through Tim's Latticework stencil.
 
detail of the cogs

texture detail; die cuts, embossing paste etc
 
(hope this counts for the challenge!)
 
Back soon!     Kay


Tim's February tag


My 'take' on Tim's 'February 2014' tag

Quite a 'simple' one this month!  I mainly followed Tim's techniques, but used stash that I had.  The 'trim' on the bottom is die cut lace, cut out of silver card, aged a little with Black Soot distress paint.  I first came across the 'chalkboard' technique over at Tim's Creative Chemistry 102 online class last year (the class is still available as an independent one) - I'm still practicing it, but I love this technique!  Once I'd finished, the tag was still looking a little 'bare' - I found a die cut, stamped & 'glossy accented' butterfly I'd done a while back.  Being grey, it toned in, so I added this to the tag.


Detail of the 'chalkboard'

Thought I'd just add this Valentines card, used the same 'chalkboard' technique, this time as a background, using various border stamps.  I think I might be using this idea in some more cards!


Back soon!     Kay

Friday 31 January 2014

Creative JumpStart 2014 - homemade 'Gelli Plate'

A couple of the videos for Creative Jump Start 2014 (www.nathaliesstudio.com) used household items to create a gelli plate for mono-printing.

Inspired by Julie Fei-Fan Balzer and Louise Nelson, I decided to give it a go.

I actually made my 'gelli plate' from a piece of 'fun foam', which seems to be standing up well to its use!
home-made 'gelli plate'
Using turquoise and tapioca paint, & blue and green card, I started to play! On some I also used a stamp with the paint. 


I did several more!  The brighter green and blue are the colour of the card, as I used a mask of torn paper to create the background shape.
 
I decided to make a card from the one on the right.
 
 
 I had already stamped the 'flowers' in both paint colours. I sketched round the edge of the masked shape with an opaque white pen.  I stamped the butterfly and corners and embossed them with Stampendous Frantage aged silver embossing powder and finally added the ChitChat words and the raffia bow.
(Household objects - torn paper from notebook, raffia, (& home-made 'gelli plate') & I used Stampendous embossing powder as mentioned above.)
 
Back soon!     Kay