Wednesday 14 December 2011

a white Christmas?

Here's my entry for Chocolate Baroque's white Christmas challenge...

So when I decided to enter the challenge, I searched through my stamp collection, and, lo & behold, I couldn't believe that I hadn't got any of Chocolate Baroque's beautiful Christmas stamps! How that happened I don't know!  So apologies to Glenda & Chocolate Baroque (& I will definitely have some by next Christmas!).

Anyway, so working with Tim Holtz's trees stamp, I heat embossed them in white.  I stamped the smaller card on a creamy cardstock, and the larger card on white.  I used iced spruce distress ink (from Tim's Winter Collection) for the background on both.  I was struck by the difference in colour on the two cardstocks!  But whichever cardstock it's on, I think it gives a very wintery feel (just right for a white Christmas!).

PS I love all the colours in the Winter Collection, but I think Iced Spruce is my favourite!

Tuesday 13 December 2011

12 tags - day 12

So its the last of Tim's tags for 2011!  Did he save the best to last?  I love, love, love Tim's 12th tag!  I love the muted colours, I love the 'frozen Charlotte', I love the tissue wrap (wishlist!) - in fact I love everything about it!!!
Here's my version ...
I added a layer of Christmas vellum over the top of the stamped & inked tag, which took ages to stick (and bubbled alarmingly!).  This also made the tag bend up - I sort of got around this by adding a piece of rigid cardboard behind the window/dwelling shape (which I cut freehand from grungepaper).  I had some German (Dresden) scrap wings which I painted with pewter distress crackle to dull it down a bit (& I also used this on the tiny flower brad).  I made a die cut rose flower out of silver 'angel hair' - I couldn't curl the petals up so much as usual, so I left out the single petal from the middle & added a pearl bead.  I also used a strip of this for the ribbon - I coloured it & the rose a little with iced spruce - I love this colour (I wasn't too sure when I first saw it, but I soon changed my mind after using it!)

I've learnt so much in the last 12 days!  It's been fantastic being able to continue on my creative 'journey', with Tim as a guide, showing every step of the way!  I've enjoyed the challenges of finding alternatives & substitutions, I've even enjoyed the (quite a few) frustrations!!
So its back to reality now; more presents to buy & wrap, cards to write & send, house to clean & tidy, Christmas cake & pudding to make, dining room table (my craft space!!) to clear so we can eat Christmas dinner (and just 2 or 3 crafty items to complete before Christmas Day)!!!

Wishing everyone "Merry Christmas", "Season's Greetings", "Happy Holidays", and a wonderful & peaceful New Year
Back soon, Kay

Sunday 11 December 2011

12 tags day 11

Tim's tag is wonderfully retro 1950's & colourful - I knew I should have bought the stamp set!  And I can't believe I haven't got any of Tim's christmas wording stamps!!! (just another couple of things for my wishlist!!).
As I'd already used Tim's 'vintage' Santa and 'damask' reindeer on previous tags, I decided to use PaperArtsy stamps instead, hence red greeting & the green tree! I just love the effect of distress ink on glossy card, flicked with water; as Tim said in his blog, "the water droplets will create a faux-bleach effect on the gloss paper (way more than using this technique on regular cardstock)."  I love the background to my tag (in reality, its a brighter blue!)
I failed on the shrink plastic/UTEE embellishment!  I've know I've got some shrink plastic - somewhere - (no doubt I'll find it when I finally clear up after Tim's 12 day tag 'marathon'!!) and I have got a little UTEE, but no melting pot (it's been on my wish list for ages! - hint to Santa!!).  So Instead, I die cut a star & embossed it with a texture fade, coloured it with alcohol ink (mainly salmon, with a tiny touch of cranberry, a sort of 1950's colour?) & added some glossy accents (which I think I was a little heavy-handed with, as they took ages to dry - perhaps I should have just used some distress stickles!)
Well, its the last lap now, just 1 more tag to go - this year!  I'll certainly miss doing them every day!
More tomorrow,  Kay

Saturday 10 December 2011

12 tags - day 10

Tim's beautiful tag uses Facets - but anyway, I've got Fragments!  I found a 'vintage' piece of clip art and decided on using 2 Fragments, one for the lady & one for the little child in the sleigh - the tape transfer worked wonderfully! I decided that "play" was a word which went with the tag (cut from one of Tim's adage tickets). I painted the foliage & pearl beads with brushed pewter distress crackle paint - it didn't really crackle - it was probably too thin a layer - but I liked the vintage metallic colour they ended up!
Here's my tag ...

I can't believe there's only 2 more tags to go - I have loved the challenge of creating tags based on Tim's ... 

Next one soon! Kay

12 tags - day 9

And on to day 9 - love Tim's technique of clear embossing the background and then inking the whole tag and clear embossing the whole (with a little distressing!) - a vintage damask look...  I decided to use the two greens (evergreen bough & iced spruce) for the background, using the red as the accent on the robin ... Here it is...

Next tag in a mo' ... Kay

12 tags day 8

It was 'catch-up day' today with 3 tags to do!
The first was day 8, 'Steampunk' - love Tim's tag!  Here's my take on it...
Christmassy colours,and holly & berries 'indicated' by 'gems'.  I used a keyhole for the centre of the gears, hence the key attached to the ribbon.  I didn't really have enough room for the 25! The gentlemen are from a PaperArtsy stamp.
Back in a mo' with some more tags!  Kay

Wednesday 7 December 2011

12 tags - day 7

Kraft glassine - I've wanted to get some for quite a while now, but had always put off getting it, so I thought today, why not treat myself!  I was in London for the day, & made my way to my favourite craft shop there, only to find they hadn't any in stock! (so once again my wishlist has got longer!).  But I really really liked the effect of the glassine holly leaves on Tim's beautiful tag, & I didn't want to just cut some more holly leaves out of cardstock! so...
I experimented with greaseproof paper, crumpled & coloured with alcohol and distress inks -  the paper is quite thin, I think I might have done better with craft vellum?  But anyway, it sort of gives a somewhat similar-ish effect, I think?
And I loved his 'ghost stamping' technique, I can see me using that a lot!
Here it is ...
Back tomorrow!
Kay

Tuesday 6 December 2011

12 tags - day 6 - half-way there!

Another day, another technique, another challenge!
Embossed on metal, then painted with acrylic, then heat embossed - vintage gorgeousness from Tim, so bright & colourful!
I think I need some brighter acrylic paints (wishlist again!) or distress with a lighter brown, mine turned out very muted grungy-vintage rather than bright grungy-vintage!  I've got several texture fades, but not the one Tim used (!) so I drew planned out squares & rectangles to fit the tag, cut out the shapes & embossed them all individually, then glued them to the tag.
Here's mine ...
So, 6 tags done, 6 more to go, can't wait to see what Tim comes up with for the second half!
Back soon!


Kay

12 tags - Day 5

I love this technique, which works like magic!!!  I knew I would need my grungeboard packaging sometime (!), & I did!!  To stamp on the alcohol inks in black archival & then immediately wipe it off which takes alcohol ink away in just the right places - brilliant!!


Tim's is here, (his "reverse stamps" are now on my wishlist, which is getting longer daily!) &
Here's mine...
I'll be posting the next tag in a mo'!, so...
Back soon!


Kay

Sunday 4 December 2011

12 tags - day 4

Tim's day 4 tag - frosty and wintery and lovely!

Me - snowman die? no!  Mover & Shaper (they cut out inside a die shape), yes, but not one suitable!
So, I die cut a Christmas tree, & punched out (with great difficulty!!!) holes as baubles, which I ended up filling up with sparkly distress stickles!  I loved the techniques on this tag & the wintery effect they gave!
Here's mine...
Again, a little brighter in reality (I think I must start taking the photos in the day, rather than at night!)


Next tag is due tomorrow morning - can't wait to see what it will be!

More soon!  Kay

12 tags - Day 3

Tim's tag 3
This was quite a challenge, & I made lots of substitutions!  I've got three re-inkers (blue, mauve, turquoise) & I haven't got any sets of stamps/embossing folders!
So, I stamped the trees a couple of times with a "custom" ink pad using the re-inkers, (kind of obliterated by the perfect pearls mist!) & attempted to emboss by using a die-cut as a stamp and then embossed it into the tag!  Finally, I die cut the letters, inked & added them.It's actually a bit more colourful that it appears in the photo!
So here it is, anyway ...

I've not quite finished day 4's tag (another challenge!), so that'll be in the next post...

Back soon!  Kay

Friday 2 December 2011

12 tags - day 2

OK, so how come I haven't got a reindeer die?!!! (actually, I've got a small one, but it didn't seem quite right).  And no kraft resist paper!  So, how about using what I already have and substitute or improvise!!!
Robin's are Christmassy, right?!  And how about trying to make my own kraft resist paper?  So, brown paper, words & tree branches stamped in black, then trees stamped and embossed clear, which resisted the inks!
Mind you, I have a 2nd item on my wishlist now - kraft resist paper (and larger reindeer die before next Christmas)!

So here's my 2nd tag:
And here's Tim's beautiful tag for day 2

I'm loving doing these tags but I probably won't get one done tomorrow as its the guest market at Watford Market - I shall have to do two on Sunday!

More soon!  Kay

Thursday 1 December 2011

Tim Holtz - 12 tags of Christmas - Day 1

Every year Tim Holtz does 12 tags of Christmas, starting 1st December and posts them on his blog.  For the first time, I've got a little more time for myself (!) so I thought I'd have a go at doing a tag a day, inspired by Tim's tags.  Here's my first one:
See Tim's beautiful tags here

I couldn't add the pine cones, ! haven't got the die and it got too late to see if there were any real ones on our tree in the garden!  So I added a rosette instead!  Tim's pine cone die is now on my wishlist - his video shows how to make roses with the same die as well!

More soon (tomorrow?!)  Kay

Monday 28 November 2011

more mixed media

I've now caught up with the last two assignments for the Mixed Media Workshop - lucky they have Thanksgiving in the States, (and didn't post a lesson last week) otherwise I'd still be playing catch-up!

Anyway, the one for 2 weeks ago was to create an abstract collage using a shape - I decided on squares (although a couple of rectangles managed to creep in!).


And last week's was a beeswax collage - luckily Robin's mum had bought me a lump of natural beeswax years ago - I knew I would use it sometime!!  I didn't really have any of the other recommended tools (apart from a heat gun) but I at least managed to produce something!


This is smaller (5" x 7) than the other canvas. I knew what stamps I wanted to use & for it to have a vintage, grungy & distressed feel - I definitely had moments of distress when it wasn't going right! - it's the first time I've ever used beeswax, so it was a great 'learning curve' for me!  Very Tim Holtz, this one - I used his stamps, distress inks and alphabet die! (link to his blog).
I don't really know about this one - I like the design, but what I don't like is that the surface should be smooth & level (apart from the holly texture & the die cut letters), but it isn't - I shall have to practice some more! (and maybe get a different heat gun which isn't so 'blowy', which was one of my main problems - it moved the melted wax around too much, so some parts were hardly covered, and other parts were too thick!).

Talking about Tim Holtz, every year he produces 12 Tags for Christmas, doing one a day (starting 1 December) & posts them onto his blog - can't wait to see what he does this year - so looking forward to his inspiration!

And I'm hoping to do a "White Christmas" themed 'something' for the Chocolate Baroque challenge (see sidebar) - I've got a couple of weeks to get it done!
Back soon!     Kay

Friday 18 November 2011

Xmas pudding cup cake card!

Thought I'd use my cup cake dies for Christmas, hence this card ...


And a "reindeer & trees" card (in different colours)!


It's the next guest market at Watford Market tomorrow... & I've decided to offer to personalise the cards, with names (Mum & Dad, Granny & Granddad etc) and/or greetings, "while you wait"...

More soon!

Kay

Wednesday 16 November 2011

pink taffeta!

Here's my finished first project on the mixed media workshop course. I didn't change a lot since I posted, but I added some ric-rac instead of the silver trimming, and some 'flower' ribbon, a large flower made from mulberry paper, & the words 'pink taffeta' at the bottom.

On to the next one now, which is another collage, but this time it has to be abstract ... I think I'll be using squares ...

More soon!

Tuesday 8 November 2011

making Christmas cards? this early?!

So, I've been making Christmas cards!  In October/November!  Unheard of! (I'm usually making them in December, ready to send off 1st class as I've usually missed the 2nd class posting date!).  But Watford Market has got a guest market which I'm doing (first one was on Saturday), next are November 19th, December 3rd & December 17th, so I though I'd better make a start!  Here are some of my new cards...

stamped


stamped & coloured


stamped, stencilled background


stamped


die cut


And not forgetting a few new(ish) birthday cards! 
die cut


die cut


stamped on card & paper

stamped & coloured


More soon (when I've had some more ideas)!


pink taffeta dress!

I found the "pink taffeta dress" photo!  It was taken at a friend's birthday party in her garden with her dolls - we must have been about 7?


My favourite dress, so sad when I grew out of it!

So anyway, I decided to use part of this as a focal point of my first assignment for the Mixed Media Workshop course I've just started, a collage with a gel transfered, photo-edited photo.  I had a 'slight' problem in that we haven't got any photo editing software on the computer apart from that in Word and Paint!!!  Anyway, I selected just me, played around in Word with contrast and brightness, erased the background in Paint, and ended up with

 which I reversed for the transfer.

I had a "happy half-hour" looking through some of my old children's books to find some images for the collage background - The Children's Wonder Book (fairy, folk and classic children's stories) and The Baby's Opera (nursery rhymes illustrated by Walter Crane).

I've not finished the canvas yet, it needs a bit more, but here's what I've done so far;


& I think I shall add the words 'pink taffeta' somewhere...

Back soon!

Kay

At last, another blog post!

Well, its been a few weeks since I blogged last - I don't know where the time goes!

Firstly, piccie of my final Mixed Media course assignment - theme - corrugated cardboard & recycling:

So, I used the back of a washing tablet packet (tore most of the top layer off to expose the corrugated card), I stamped the gentlemen and butterflies on scraps of the cotton from the previous week, the pale green ribbon had become stained with ink, but the colours worked with this!  I printed the photo onto photo paper, and as the words on the gentlemen stamp didn't show up very well, I stamped these again onto the scrap from cutting out the photo - so I think I did what I could to recycle!  The photo is of my great grandfather (Dad's grandfather) who collected butterflies as a hobby.  I remember my grandma had a couple of his butterfly displays in her flat - I've no idea what happened to them.

(An aside: my family have now just about given up trying to persuade me to throw away scraps of paper, card and materials!)

The altered book course has also finished now, though I've still got to do the final assignments (altered book clock and altered board book!).  And I haven't finished the book itself yet; although I started out trying to "theme" it to the book itself (a copy of Homer's Illiad), I've ended up using it for trying out techniques - though I'm determined to do at least a couple of "themed" pages before I'm finished!
Anyway, here are a few of my pages;


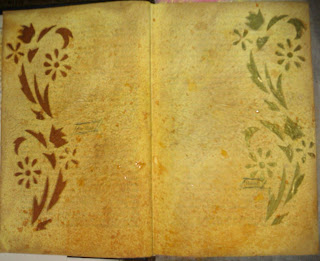
pages with gesso, & gesso used with stencil, then coloured


beaded window


pop-up page, with large tags in pockets

I'm quite pleased with these, although I must admit I still have a little problem altering a book which then can't be read!!

Anyway, I'm onto another online course now, Mixed Media Workshop, so I'll be posting more very soon!

Back soon!

Kay

Tuesday 11 October 2011

Time for some piccies, I think!

Here's some of the things I've been doing recently ...

Online course - Mixed Media (with My Creative Classroom)

Assignment 1 Fabric Collage
Assignment 2 Canvas collage


Assignment 3 Printing & painting on fabric


Assignment 4 still to be completed!


Altered Books

So , what's An Altered Book??? – well, anything goes !!!!!!!!!!!!!!!  An old book is transformed into a “work of art”, using the pages as “blank” canvases ...

Upside is; you can do anything you want to it – paint, stamp, decorate, embellish, fold pages, burn pages, weave into pages, make pockets, add anything (and everything!)

Downside is; you end up with a (hopefully!) beautiful book, but you won’t be able to read it !!!!!!!!!!! (or not most of it anyway!!)

So you can probably realise that this is way way outside my comfort zone!!!

Anyway, I'll post my progress (or non-progress!) on my book (a copy of Homer's Illiad) here.

Back soon!

taffeta .... attic?

My "taffeta" photo must be down at Dad's - will post soon!

And why "attic"?  I guess it has connotations for me of exploring and inspired by the past, finding scraps of ephemera, using these to create in the present.
But no, I don't create in our attic (or loft)! though I might have to expand up there sometime!  At the moment it all takes place in our dining room, on the table (we haven't sat down for a meal for ages!!!)

Back soon!

Friday 7 October 2011

Hi there!

Hi there!
Welcome to my new blog, with all things crafty!

Why taffeta attic?  I wanted a name which was sort of "vintage / retro / grungy" to go with my crafting endeavours!  And I remember a beautiful pink taffeta hand-me-down dress I had as a child - I loved that dress!  I think I've got a photo somewhere...

Back soon!